


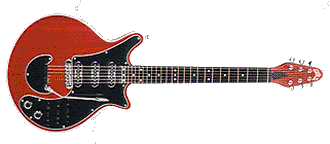
 Guild Pro '93 replica
As you read through this diary of how I made my Red Special, you may notice that I "jump about" between different aspects of making the guitar. The reason I have done that is because I am creating the guitar at different sites. I can only create certain aspects of the guitar at certain locations. The bulk of the wood cutting/shaping is done at my girlfriend's house, while all other aspects are done at my house.
March 2005
19th March 2005
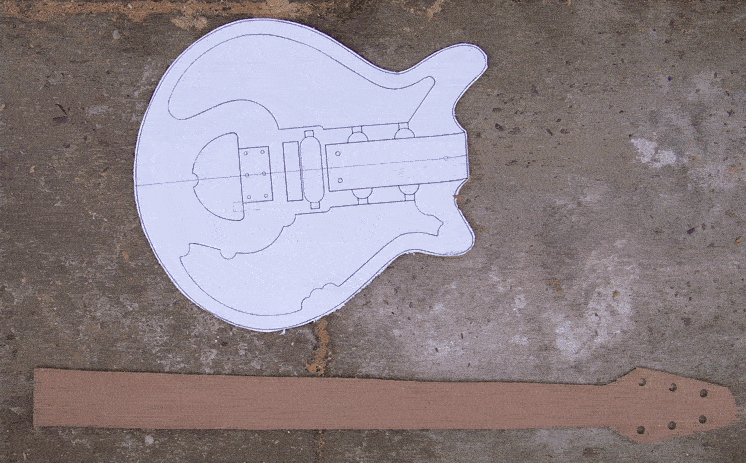
- Created templates for neck and body.
- Sanded, planed, and roughly cut mahogany for neck.
23rd March 2005
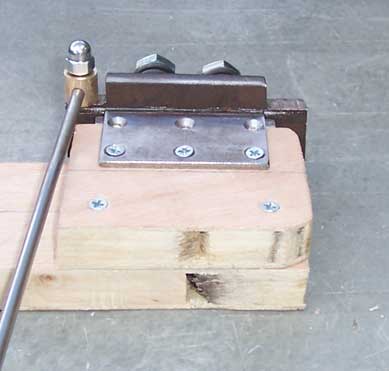
- Started constructing bridge.
24th March 2005
- Continued constructing bridge.
25th March 2005
- Routed the truss rod channel on the neck.
- Routed the neck using the template.
- Transferred design of side view of neck onto neck itself.
26th March 2005
- Marked out the fret positions on fretboard.
April 2005
1st April 2005
- Scored the positions of the frets on the fretboard.
3rd April 2005
- Marked out the oak centre.
4th April 2005
- Cut out the neck (depth).
5th April 2005
- Cut out the oak centre.
6th April 2005
- Sanded the oak centre.
- Glued together the two halves of the oak centre.
7th April 2005
- Successfully created a white top for the switches.
June 2005
18th Jun 2005
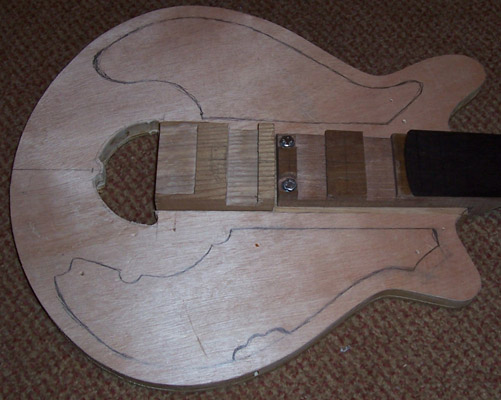
- Completed the neck joint.
July 2005
1st Jul 2005
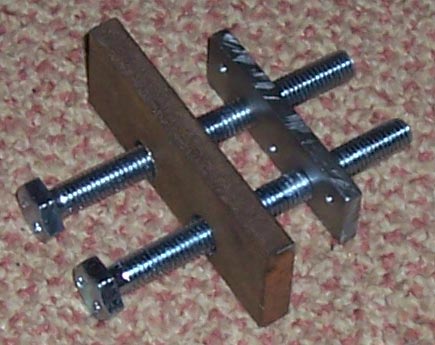
- Started the bolt retainer - cut the metal and prepared.
2nd Jul 2005
- Finalised truss rod channel.
- Cut truss rod to length.
- Cut a peice of wood to force the truss rod to bend - placed on top of truss rod in channel.
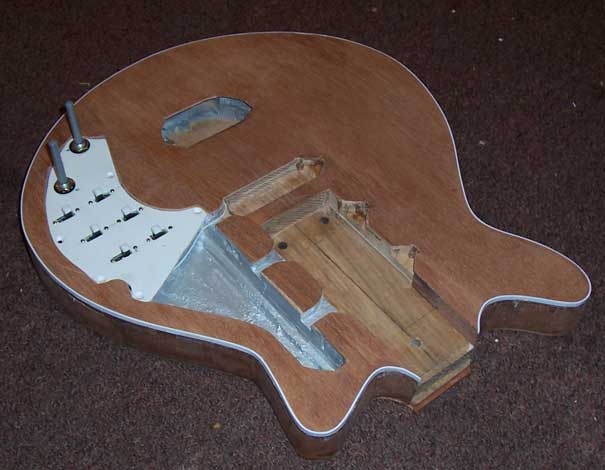
- Routed out recess for pickups.
- Routed out recess for knife-edge.
- Drilled holes for machine heads/tuning pegs.

3rd Jul 2005
- Threaded truss rod end.
- Fitted truss rod.
- Sanded down headstock.
- Marked out holes on bolt retainer.
4th Jul 2005
- Drilled holes in bolt retainer and countersunk.
- Created a new roller for bridge (testing stage).
- Started cutting tremolo block.
7th Jul 2005
- Abandoned my bolt retainer due to an error.
- Started and finished a new bolt retainer.
- Drilled clearance holes in tremolo block.
- Finished cutting tremolo block.
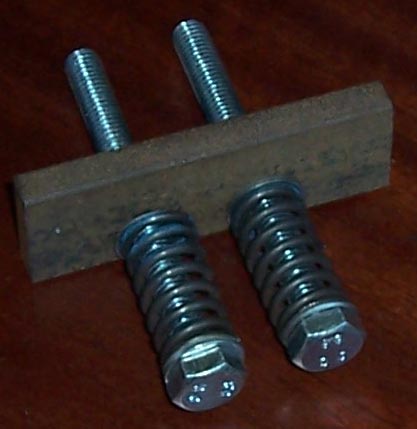

8th Jul 2005
- The springs arrived which were fitted for testing.
9th Jul 2005
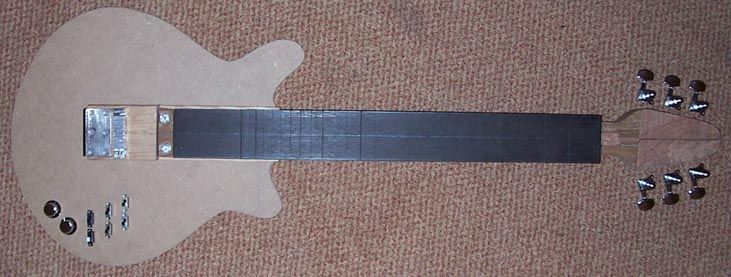
- Shaped the curve on the back of the neck.
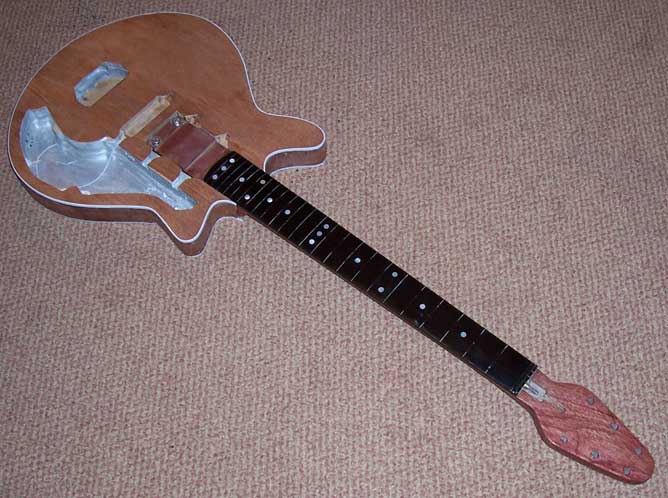
- Aligned the fretboard on the neck for marking.
- Used a jigsaw to cut off access areas of the fretboard.
- Rounded off body end of fretboard.
- Fitted the truss rod.
- Glued the fretboard onto the neck.

13th Jul 2005
- Removed edges of fretboard.
- Sanded the neck down.
- Cut out the excess steel from the tremolo block.
14th Jul 2005
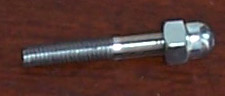
- Cut length of stainless steel rod for tremolo arm screw.
- Threaded both ends of stainless steel rod for tremolo arm screw.

15th Jul 2005
- Drilled hole in tremolo block for arm screw.
- Threaded hole in tremolo block for arm screw.
- Started creating recess in tremolo block for knife-edge.

16th Jul 2005
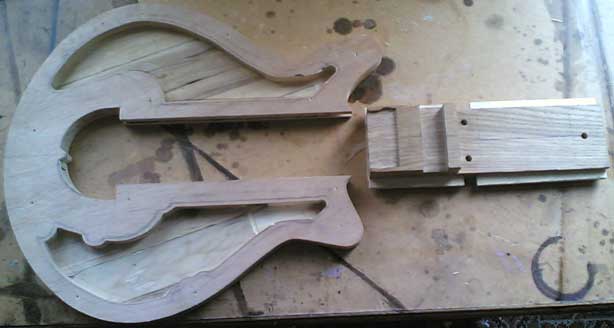
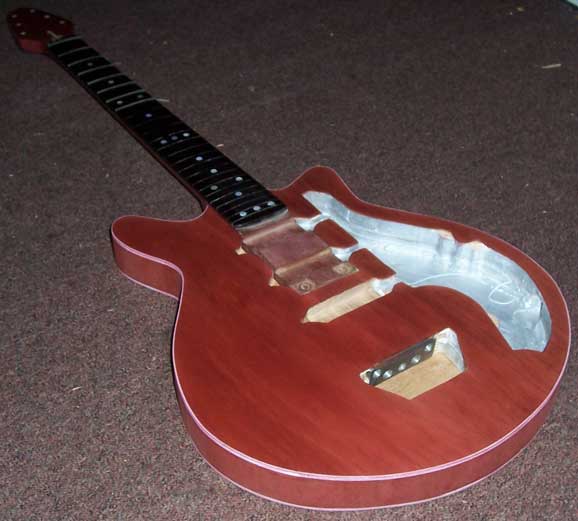
- Cut out blockboard for the body using the template.
- Cut out 4mm plywood for the body using the template.
- Cut out centre section for oak.
- Cut out tremolo section.
- Glued 4mm plywood to the bottom of the bottom blockboard.
17th Jul 2005
- Transferred cavity plans onto blockboard.
23rd Jul 2005
- Created a template for the cavities of the blockboard.
- Routed out cavities of the blockboard.
26th Jul 2005
- Cut out the oak centre area on the top blockboard.
- Cut out the tremolo cavity on the top blockboard.
- Created a 'tongue and groove' joint to join the oak centre to the blockboard.
28th Jul 2005
- Cut the fret slots in the fretboard.
- Worked a little on the tremolo cavity.
- Created a 9" radius block.
- Created the radius on the fretboard.

30th Jul 2005
- Filled in all 'holes' around the outside of the blockboard, as well as in the cavities.
- Created 'tongue and groove' slots in the oak centre and top blockboard section.
- Routed out the recess on the blockboard for the pickups.
August 2005
2nd Aug 2005
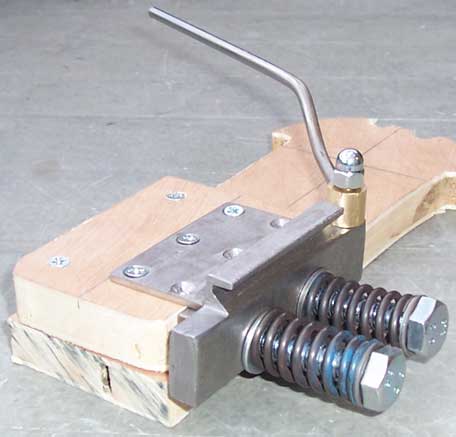
- Created the brass tremolo arm holder.
- Worked more on the tremolo block.
- Tested tremolo unit.
3rd Aug 2005
- Cleaned up the tremolo block.
- Created the recess for the strings in the tremolo block.
- Drilled the holes in the tremolo block for the strings.
- Refined the knife edge slot.
- Test tremolo unit again.
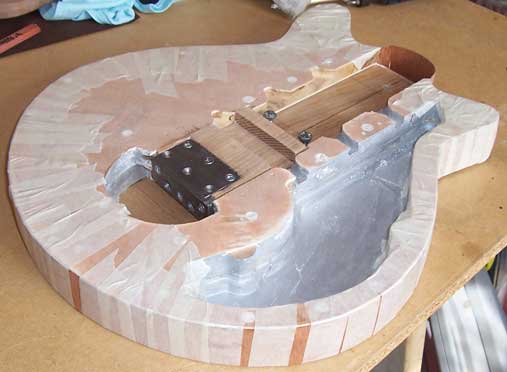
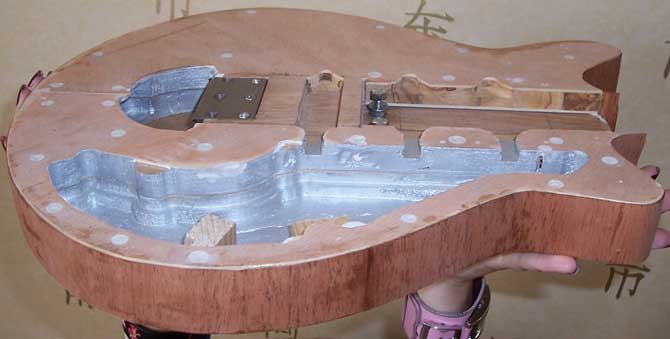
6th Aug 2005
- Routed the correct dimensions of the control cavity.
- Routed the recess for the control plate to sit on.
- Routed out the hole for the jack socket.
- Routed out the 'excess area' for the tremolo unit.
- Screwed the tremolo bolt retainer to the oak centre.

10th Aug 2005
- Primed the cavities.
- Painted the cavities using 'metal' paint.
- Glued and screwed the blockboard pieces together.
- Refined the fretboard radius.
- Started sawing the fret slots.
20th Aug 2005
- Cut tremolo bolts to correct length.
- Cut slot in top of bolts for adjusting.
- Drilled holes in body to access bolts for adjusting.
- Applied lacquer finish to tremolo block and knife edge (just for protection).
- Finished cutting all the fret slots.
- Refined neck.
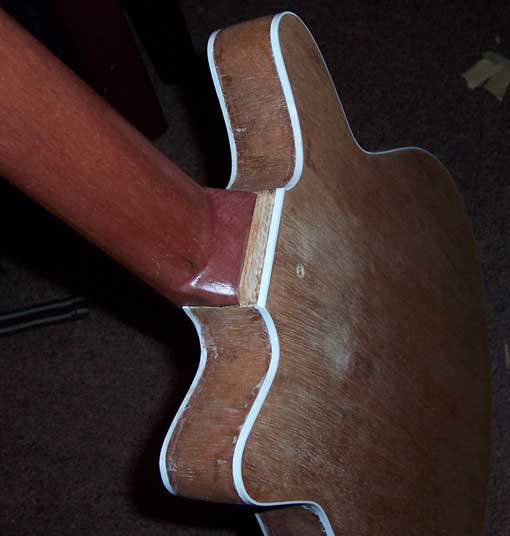
- Added a 45° 'piece' to oak centre for binding (where neck joins).
- Sanded body and neck.
- Screwed knife edge to body.
26th Aug 2005
- Created the nut.
27th Aug 2005
- Routed the recess for 'back cover'.
- Created back cover.
- Routed the binding channel.
- Cut the binding the correct length/width.
- Marked out the fret markers.
- Drilled fret markers using a small drill bit - for reference only after we apply the finish.
- Refined the neck/fretboard one final time.
- Sanded down the neck.
- Dyed the fretboard.
- Glued and nailed 'back cover' to the body.
September 2005
3rd Sep 2005
- Cut out the control plate.
- Drilled holes in control plate for pots, switches, and screws.
- Created two 'legs' to support the control plate.
- Sanded down the sides thoroughly.
- Cut the veneer for the sides.
- Glued the veneer onto the sides of the body.
- Stained the neck.
4th Sep 2005
- Removed the masking tape from the body (veneer).
- Stained the neck again.
- Applied a coat of sanding sealer to the neck.
- Added 4mm plywood for jack socket to screw to (behind veneer).
5th Sep 2005
- Applied 4 coats of sanding sealer to the neck (2 hours between each coat).
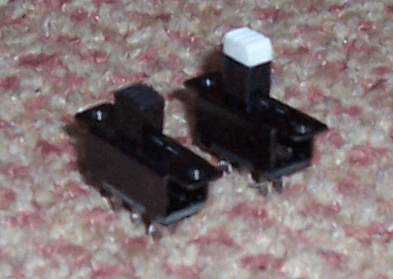
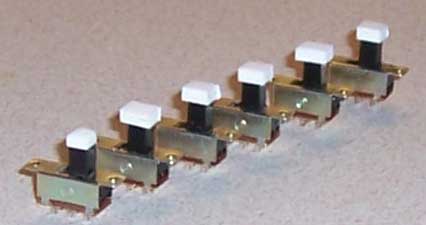
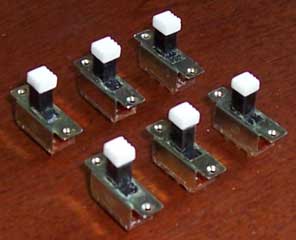
- Started adding/creating white tops for the switches.
6th Sep 2005
- Applied another coat of sanding sealer to the neck.
- Finished adding the white tops to the switches.
- Fixed the pots and switches to the control plate.
- Starting soldering the wiring.
9th Sep 2005
- Applied some wood filler to back of guitar.
10th Sep 2005
- Sanded down neck for another coat of sanding sealer.
- Cut out veneer for top and bottom of body.
- Added some extra pieces of wood (onto body) around neck joint.
- Sanded down the back of body (due to wood filler).
- Glued the veneer to the bottom of body.
17th Sep 2005
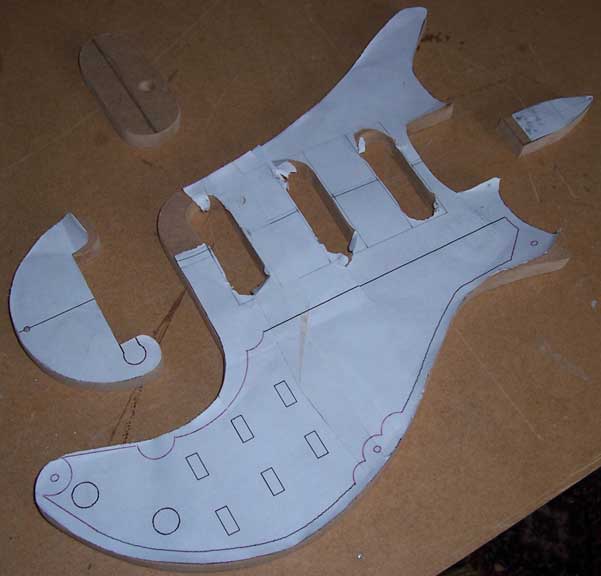
- Transfered scratchplate plans onto MDF.
- Cut out templates from MDF using a jigsaw and drill.
- Refined templates.
- Fitted earth wire to tremolo unit.
- Glued veneer top to the body.
- Applied lacquer to the entire neck.
18th Sep 2005
- Removed excess veneer from around the sides of the body.
- Recreated the binding channel on both sides of the body.
- Glued the binding into the upper channel.
- (8 hours later) Removed masking tape and sanded binding level.
19th Sep 2005
- Refined the binding around the neck joint.
- Removed excess veneer from the inside of the body.
21st Sep 2005
- Glued binding into the lower channel.
22nd Sep 2005
- Removed tape from binding.
- Trimmed/sanded binding level with body
25th Sep 2005
- During the course of last week 4 coats of lacquer were applied to the neck.
27th Sep 2005
- Drilled the holes/recesses for the fret markers.
- Glued the fret markers into the holes/recesses.
October 2005
1st Oct 2005
- Lightly sanded and wirewool-ed the neck down.
- Recreated the template for the scratchplate.
5th Oct 2005
- Glued some mahogany veneer into neck pocket.
6th Oct 2005
- Glued some mahogany veneer onto end of oak centre.
9th Oct 2005
- Shaped mahogany veneer at end of oak centre.
- Glued on binding across neck (on body).
- Shaped the binding.
10th Oct 2005
- Sanded the sides of the body.
- Sanded the rest of the body
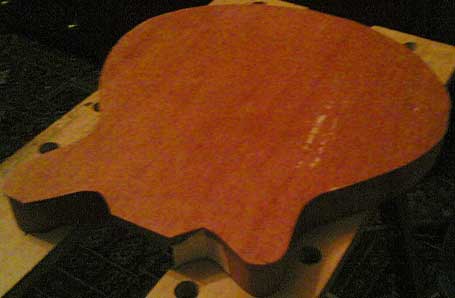
- Applied red mahogany dye to the body.
11th Oct 2005
- Added more frets to the fretboard.
- Applied two coats of sanding sealer to the body.
- Scraped off the dye and first coat of sanding sealer from binding.
15th Oct 2005
- Applied one coat of sanding sealer to the body.
November 2005
7th Nov 2005
- Applied one coat of sanding sealer to the body.
30th Nov 2005
- Finshed the 'finish' on body (during previous week).
- Continued with making the bridge.
December 2005
8th Dec 2005
14th Dec 2005
- Polished visible areas of bridge (saddles).
- Anodized bridge.
- Started to trim the saddles to correct height.
16th Dec 2005
- Finished triming bridge saddles to correct height.
- Cut out truss rod cover.
- Drilled screw hole in truss rod cover.
- Counter-sunk screw hole in truss rod cover.
- Fitted machine heads / tuning pegs.
19th Dec 2005
- Refined the scratchplate template.
- Cut out scratchplate, tremolo cover, and truss rod cover.
- Beveled edges of scratchplate, tremolo cover, and truss rod cover.
- Cut out and beveled scratchplate under bridge.
- Drilled clearance holes in scratchplate under bridge
- Filed down screw heads for bridge.
- Drilled clearance holes in body for bridge screws.
- Screwed the bridge to the body.
- Drilled screw holes in scratchplate, tremolo cover, and truss rod cover.
- Counter-suck screw holes in tremolo cover and truss rod cover.
- Drilled holes for fret markers on side of neck.
- Glued pearl markers in side of neck.
- Drilled and screwed strap holders to the body.
20th Dec 2005
- Cut holes out in scratchplate for pots and switches.
- Enlarged holes in pickups for screws.
- Fitted pickups (inc adding shims under pickups and drilling clearance holes for screws).
- Soldered jack into circuit.
- Soldered pickups into circuit.
- Attached jack to body.
- Screwed control plate to body.
- Screwed scratchplate to body.
- Fitted knobs onto pots.
21st Dec 2005
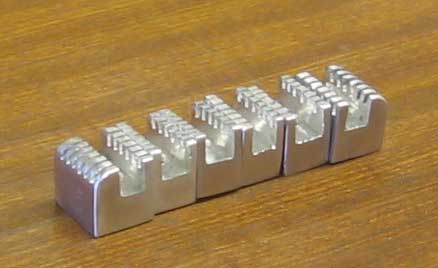
- Created remaining 5 rollers for bridge.
- Created remaining 5 axles for rollers.
- Fitted rollers and axles into the bridge.
- Fitted strings onto guitar.
22nd Dec 2005
- Resolved an electronic problem - faulty pot.
- Refined pickup surround template.
- Created 3 pickups surrounds from template.
- Beveled pickup surrounds.
- Cut section out of first pickup surround for bridge pickup.
- Modified third pickup surround for neck pickup.
- Attached pickup surrounds to scratchplate.
- Resolved main tuning problem with zero fret.
May 2006
I thought I would share this picture with you. Before I dismantled my RS I took alot of picture to 'before' and 'after', and I looked at this picture and thought it looked very good. So here it is for you. By the way, this IS a picture BEFORE I improved anything.

After a long time since I semi-completed my RS, I returned to resolve some problems and hopefully complete it. After this time, hopefully, I will not need to do anything to it except usual maintenance.
6th May 2006
- Dismantled my RS.
- Applied more coats of lacquer to body and neck.
- Removed old switches.
- Added white tops to new switches using same method as before. (here)
- Add rubber ring to tremolo arm bolt (using skrink-wrap).
- Started and finished making the knob for the tremolo arm.
- Fitted the tremolo knob to the tremolo arm.
7th May 2006
- Applied more coats of lacquer to body and neck.
- Modified control plate take new switches.
- Fitted new switches to control plate and soldered.
8th May 2006
- Applied more coats of lacquer to body and neck.
9th May 2006
- Applied more coats of lacquer to body and neck.
- Started making surroundings for access holes to the tremolo bolts
10th May 2006
- Applied more coats of lacquer to body and neck.
- Finished making surroundings for access holes to the tremolo bolts
13th May 2006
- Applied more coats of lacquer to body and neck
- Fitted the tuning pegs
14th May 2006
- Fitted the control plate and pickups back into the body, and soldered the relevant parts
- Fitted surroundings for access holes to the tremolo bolts
- Fitted the bridge and tremolo unit
- Re-attached tremolo arm to brass section
15th May 2006
- Fitted tremolo arm